Showing posts with label DIY. Show all posts

Friday, June 21, 2013

Recipe : Horchata

Have you ever had Horchata (pronounced - or-chata)? 

I recommend you try it.  I had never had it, ever, in my life.
Until now.

I enjoy watching cooking shows on PBS Saturday Mornings (when I am not out and about doing anything else), and there is was Mexico One Plate at a Time with Rick Bayless show on.  (I see now it is on the Live Well Network

At any rate, I saw an episode a long time ago, where Rick talked about how fabulous Mexican Horchata is.  It goes great with a spicy carnitas burrito he said.  I was like whatever dude, you are a crazy nut berger.  Basically what it was that he had described, was a sweetened almond/rice milk. 

A few weeks later I ended up seeing a post on the America's Test Kitchen Feed, and was like.. well, what do we have here?  Sounds simple enough!

And it was.

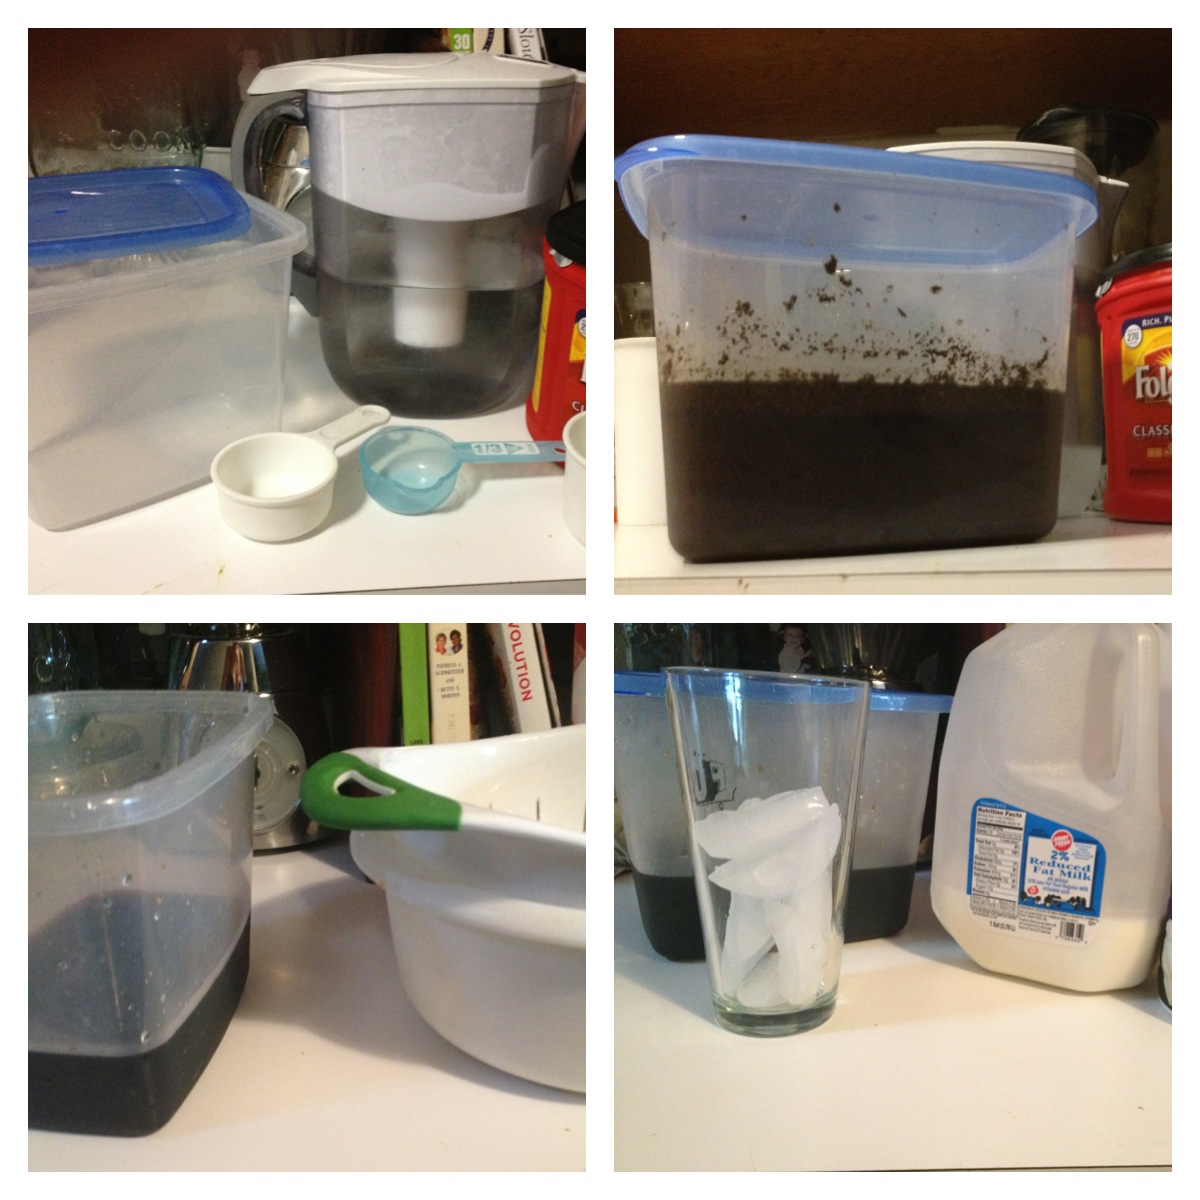
So, basically what you do, is you take slivered almonds, rice, vanilla, cinnamon and water and combine them.  Let them soak 12-24 hours, pulse it in a blender until smooth-ish, and then strain it, mix it with some evaporated milk and sugar. 


And WHAM-O!  Throw it in a glass over ice, maybe an extra sprinkle of cinnamon, and you have a delicious glass of Horchata!


It was quite sweet with the amount of sugar they said to add, they noted you could add 2 less tablespoons if you do not like yours quite as sweet, but I am thinking like maybe cut the sugar in half, and it might be more adequate. 

I may have had it in the morning while I sat outside eating cinnamon-sugar toast.

DIY Horchata (Adapted from America's Test Kitchen)
Makes about 5 cups
  • 1 1/3 cups Slivered Almonds
  • 1 Teaspoon of Ground Cinnamon
  • 1 1/2 tsp Vanilla Extract
  • 1/3 cup Long Grain Rice
  • 4 1/2 cups Water
  • 1 cup Evaporated Milk
  • 1/4 cup Granulated Sugar

  • Take the first 4 ingredients and put them in a blender, and put the lid on. Shake it around a little.  Let it sit for about 16 hours - up to 24.  (Please note I did mine for 24 hours, and it was about 70 degrees out - if it is warmer, you might want to shorten the time.)

    Line your strainer with some cheese cloth, put it over a large bowl and set aside. 
     
    After your almond rice mixture has set out long enough, turn on the blender, and blend that stuff up!  (You could probably use a Cuisinart, but I am not that fancy.) Blend the mixture until relatively smooth.  It took me almost a minute or so.
     
    Then pour the mix into the cheesecloth strainer set up you have going, let it strain itself out.  Once it has pretty much done it's work, take up the edges of the cheesecloth, and twist the cloth in a pouch to squeeze as much as the almond rice goodness out as you can.  Then toss the pulp packet out.
     
    Stir your almond/rice water mixture, evaporated milk and sugar together in a pitcher/bowl until the sugar is dissolved.  (you can add more sugar if you would like, or leave out a sugar bowl when serving it for individual tastes.)
     
    Then chill it for about 2 hours, and enjoy! 
     
    You can store leftover Horchata in a jar with a tight fitting lid for up to 3 days in the fridge.

    I will admit, I am pretty impatient, and I automatically put it in a glass over ice, tossed a little more cinnamon on it, and loved it up.

    Saturday, March 16, 2013

    Lunch : Bagel Dogs!


    So, something that I used to eat as a kid, and when I say kid, I mean 14 year old.  Were Bagel Dogs.  My mom got them from the Schwan's Man, when he dropped off our milk. Yeah, we had a milk man.  My mom was busy doing whatever work she was doing, and it was easier to make sure that we had milk in the house if we had someone drop it off.  I guess.

    Either way.  Bagel Dogs. I came across a pin on the Pintrest, which brought me to Circle B Kitchen's blog post.
    I made them and can cross them off the list of wish to re-create at home.  But I will never do it again.  I am sure the original recipe is fine, and it was probably more of user error or something.  But they were way too much work, and took way too long to make.  And I burned my little fingers.

    So, for a true bagel, you need to boil it before you bake it.  All of my hot dogs fell out of their wrappers.  So once I thought they were boiled sufficiently, I took them out, and burned my fingers trying to put them back in their jackets, and getting them to seal up as they dried a little.


    They don't look terrible, other than the not being too brown, they were chewy, the salt and seeds were delicious.  I didn't know what else to serve it with, all I could think about was Kraft Cheese and Macaroni.  And then I decided to bust open a can of fruit cocktail for good measure.  We also dipped the Bagel Dogs in traditional hot dog condiments.

    I am putting this in the Fail column.

    Have you made them and had better results?

    Monday, February 11, 2013

    Manicure Monday : Heart

    Simple design, and I was rushed. I appologize for it not looking as fab as it could have.

    So I did a nude nail, and a purple heart as my accent nail.

    You can find a tutorial here, if you would like to re-create it for yourself.  I used a little different tecnique.  I basically take 2 dots, and drag them to a point.  Same idea, but different.


    Monday, November 19, 2012

    Manicure Monday : Maroon and Gold

    Hello!
    It's Thanksgiving this week!  I LOVE Thanksgiving.  It is my most favorite holiday of the year! Everyone gets together, they eat a bunch of food, and then they just hang out.  There is no giving or receiving of gifts, just people hanging out, engaging in fellowship with one another.

    I painted my nails with Thanksgiving in mind, and I decided to do a maroon and gold look.

    I am not going to lie, it is really similar to my black cherry and gold manicure I did back in September, but I swear it's not the same, it's a little different.

    I painted all my nails with the exception of my ring finger maroon, and painted my ring finger gold.  Then I followed up with gold glitter on the tips, doing a little big of a gradient on them, and then I did all over gold glitter on the gold nail.  Sealed it in with a top coat, and viola! We have a manicure people.

    What is your favorite Holiday?

    Wednesday, October 31, 2012

    Happy Halloween!

    Happy Halloween out there! 

    As an adult, I like it more, but usually just for the Halloween Parties!  The ones I attend, generally have a lot of alcohol.

    This party, however, was for work, and I needed to bring something appropriate.  One Pot Luck item that I enjoy the most, is Spinach dip and Hawaiian Rolls.  Super simple, and people will generally eat it all gone.  Today was no different.

    I bought the rolls, and cut them up into squares, and then I came up with brilliant idea to use a French roll as the body for a mummy, and then you could dip into his stomach!  I couldn't get the head idea to work out well, I chopped it up, but I never cut all the way through, so there was the opportunity to salvage it!!

    I took 5 connected paper towels and cut them into long strips, and used those as the strips around him, and just colored with permanent marker for the eyes.  I think he turned out pretty good.
    Spinach Mummy Dip
    To help me get in the Halloween Spirit, with out dressing up, I cut up my fiance's shirt, based on something I saw on Pintrest.  He wasn't the most thrilled, but I bought him a package of muscle shirts last week, and this was an old one that had a tiny hole in it anyway.  Boys can be such babies.

    I wore the muscle shirt over a black button down, the front I left plain, and just wore some long heavy black and silver necklaces. I didn't take a good photo of my hair, or make up, but the hair was pinned in a kind of a mohawk fashion, and I had heavy black eye makeup on.  It was a little interesting when one of my boss' (yes, I have two. It's super fun - not.) came by and was 'Whoa.. I am going to have to get used to this look.'

    Here is a photo of my shirt from the back:
    Aside from the bad blurry photo, you can kind of see my wedding dress hanging in a long clear bag, it has an apron over it so, even if the fiance does happen to come into my dressing room, he can't see the top, or really any of the details of it.

    What do you think of the dip or the shirt?  I could have probably done a little better, if I wasn't already late heading out of the door, and cutting last minute.

    Do you do anything, as an adult without children for holidays?  I would love to hear below!

    Monday, October 29, 2012

    Manicure Monday : Spooky Eyes

    It's the week of Halloween!

    And with that in mind, I painted my nails black, I had seen on Pintrest these cute little googly eyed guys, and I knew I wanted to recreate them!  The original pin was from the Icy Nails blog.

    It's pretty basic.  Use a pen/pencil/toothpick, or anything with a tip, and put a large dot of the white. Once that is dry, then go back with a smaller tipped item, and put a little black dot on it to make the pupil.  Then, seal it with a topcoat!

    Hope you enjoyed. Check out Icy Nails' blog, and if you tried it, let me know! I would love to share your photos!

    Monday, September 17, 2012

    Manicure Monday : Leopard Spots

    Happy Monday!

    Well, yesterday I decided I wanted grey nails, and to add a little pop of fun in the mix,  I have done a leopard print before in my life, this time though, I decided to do the pink leopard look.


    I promise you this: it is actually easy!  Paint your nails a base color. and then grab a contrasting color, and put some on a piece of paper or something, and dip the tip of a pencil, toothpick, anything that has a tip of some sort, and kind of dab it on in a dot sort of formation, or drag it a little into a 'v'.  Keep them pretty spaced out, because you need to add the black outline to it too!  For that, put a dab of your darkest, 1 coat coverage black, or other preferred color, and just sort of add a thin line with the tip of a toothpick or what have you around the edge of the dots, 2 or 3 marks should be good.  And then put your top coat on.

    Then, as you walk around sporting your super sweet nail art, let everyone know what a bad A** you are.  Because you did it yourself.

    I just googled it, and came across this polish-a-holic's site: Candy Coated Tips.  Same idea, grey and pink.

    Have you tried this look, or do you have a nail art design you would like to share?!  Let me know below!

    Wednesday, June 20, 2012

    Cold Brewed Coffee!

    I have a new obsession.  I will admit it.  It is borderline cRaZy.  But, I am okay with it, because it also saves me a couple of greenbacks a week.  Okay.  Honestly, about $20 a week.  Which is uber ridiculous.  I know.

    Please note, both are not mine! One is the Boyfriend's.

    See, I drink what I would call 'fake' coffee drinks.  I go to the Caribou, or Starbucks and order a mocha of some sort, lately it's been over ice. At Caribou it's a White Northern Lite Mocha - no whip.  Or at Starbucks I get a Mocha Frappuccino.  I generally will go to Caribou though, not sure why, maybe because it is sweeter. 

    But my problem comes in, that I will stop 3-4 times a week. In my city, I pay $4.70 a pop.  And that is too much to be wasting a week; I would rather buy shoes or something more fun, and lasts longer.

    So I was floating around trying to find a way to make something as enjoyable at home.  I found this blog, but there are tons out there with a recipe.  And they all pretty much follow the recipe published in the New York Times.

    People say cold brewed is better for you, as it it is less acidic.  I say okay...?  Whatever that means.  The coffee does taste better than the made in a coffee maker, and cooled coffee.  There is a different flavor in it.  I am serious!

    My dad quit drinking coffee because he wasn't enjoying the flavor any more.  I didn't know that, and brought him some when I went to the Patriot Ride (post can be found here).  He was quite surprised that it was Folger's cold brewed coffee, as Folger's was his brand he drank, and he said his didn't taste like this.. :)

    I like Snapguide.  It's an app for my nifty iPhone.  It hasn't really caught on I don't think.  They have a little fine tuning to do, but I hope it does catch on.  You can make step by step guides in a SNAP! :)

    You can see the guide that I created here if you would like, but it is pretty basic.

    You will need a large container, preferably with a cover. A strainer, a coffee filter or two, a large bowl for the strainer to sit in, filtered water and your favorite blend coffee of course!
    
    Basically everything you need!

    The recipe:
    1 cup of coffee, ground
    4 1/2 cups of filtered water

    Put them together in a container, stir them up to make sure all of the grounds are wet, set it on the counter for 8-12 hours.  I do this while I sleep, and in the morning, I set up the strainer, put a coffee filter in it, and strain it. 

    AND Boom! Coffee is ready to enjoy.  But not straight - are you nuts?! This is a highly concentrated mixture!!
    
    Mix it half and half with water-milk, cream what have you, and enjoy with ice.  The NYTimes says you can heat it/add hot water to it, but I am currently not interested in trying it that way.  I fill the cup about half way with ice, dump the coffee mixture in about 3/4 full, put some milk, and about 1/16 cup of Italian Sweet Cream Coffee mate.
    
    Hello lovely!
    I am not going to lie, it is kind of nice to come home in the morning after a 'run', grab a shower, get ready for work, dump this together and head off to work.  I will literally head to bed looking forward to the morning, because I know I will be enjoying this!

    Hope you try it - SOON!